On some occasion, it is practical to have a terminal in the kitchen, mainly to check on recipes. While a phone screen is not that great, a tablet would do. I do not have any tablet and I am not that fond of systems readily available on tablets. But I do have a few old laptops around plus a Raspberry Pi B+.
Hardware
The following RasPi.TV‘s video explains it all:
Quite straightforward, you unmount and identify your screen. So for my Dell Latitude C640, I got a Samsung LTN141X8-L02 14,1″ screen for which I easily found a controller board kit on ebay for 21,5 €.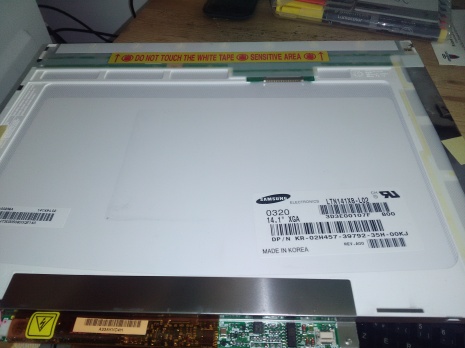
Here’s the back of the said screen, with the original inverter board still attached. The kit will include another one.
Once acquired, there is not much to think about, everything just have to be plugged where it belongs according to the seller docs:

Obviously, you need to buy also a HDMI cable and a power adapter power adapter (12V, 4A).

Obviously, as it is no tablet, it requires peripherals. I opted for a slim USB wireless keyboard with trackpad and some USB powered stereo speaker. These devices will be powered by the Raspberry Pi (a phone charger can be plugged to the keyboard to recharge it).
Finally, the charger and the Raspberry are plugged onto a power socket with 5V USB. It will be used to put on/off the whole.
Afterwards, I put the screen within a cheap photo frame and fixed the rest on some board.


That frame looks too fragile, though, I would recommend to build a proper one instead.
Software
1/ Raspbian desktop
I first tried some default Raspbian. Epiphany web browser is as bad as you cannot even set a default webpage without editing the .desktop files. And once it is done, it crashes on mediawiki standard page layout. Raspbian also fails to properly open videos (OMX sprout error messages, even with lot of memory attributed). Not convincing.
2/ Kodi media player
Afterwards, I went for LibreElec along with Kodi. Surprisingly, it loads movies with no problem, the interface is quite neat in general and the control with a distant web browser (port 8080 by default) is a plus. As media player, it would be nice.

But it is not perfect: Kodi does not provide any proper web browser, even lacking features. They only provide some cheezy sort of said text web browser. Sort of because it is no lynx/links/elinks, it is just a strange graphical interface with low HTML layout capabilities – but, kudos, it does not crash on mediawiki, yay! Nonetheless, that is quite a blocker issue for me. Even a media player, in my opinion, should have integrated web browser. It is not a challenge to reuse gecko/khtml, whatever, to make so.

3/ (tiger) VNC on top of Raspbian
So I went back on Raspbian. I found out that netsurf works fine to browse mediawiki. So just that satisfies the first requirement.
Instead of expecting to be able to finely setup Raspbian for video website, etc, I decided it might just be smarter to really think of this as terminal and so, to show some window from another computer session.
On an Devuan desktop, it is just enough to get tigervnc-scraping-server, generate a host file (for IP based control):
mkdir .vnc
echo "+IP_OF_YOUR_RASPBIAN" > .vnc/hosts
then to start it whenever you want to share your screen:
x0vncserver -HostsFile=$HOME/.vnc/hosts -SecurityTypes=None
Windows version is configured in a similar fashion.
Raspbian provides a VNC viewer graphical interface that will allow you to connect and you’ll immediately notice that TigerVNC is damned efficient and play with no problem youtube video, etc.
Ok, but VNC, while much more convenient than RDP to setup, does not care to sound forwarding.
I give some tries to PulseAudio RTP capabilities: it fails with errors like [alsa-sink-bcm2835 ALSA] module-rtp-recv.c: Sample rates too different, not adjusting (44100 vs. 90522) and when I tried to document myself about it, I found that this PulseAudio feature was bugged, flooding the network with UDP packets, a bug found in 2009 and still existing in 2017. Gosh, a feature bugged since near to a decade: back to why I try to keep away from systemd and anything made by the same crowd.
I ended up streaming audio with vlc,
cvlc -vvv pulse://`pactl list | grep "Monitor Source" | cut --delimiter ":" -f 2 | tr -d [:blank:]` --sout "#transcode{acodec=mp3,ab=128,channels=2}:standard{access=http,dst=0.0.0.0:9999/pc.mp3}" &
simply played on the Raspbian with:
mpg123 http://hostname:9999/pc.mp3
I has been summarized in a script to be run on the distant host side. I considered stream both audio and video with vlc but it is convenient to be able to move around with VNC. This will require further testing.
